This page is an overview of general conceptual and practical content.
Regardless of the age and experience of students being taught; Photography as a practice and area of study has common components and overarching concepts.
Whether you work with traditional ‘wet photography’ i.e., film, darkroom, TLR, Rangefinder of SLR cameras one body of knowledge is common to all. This only changes when students work with digital media i.e., mobile phones, DSLR, Mirrorless cameras and a range of post processing options and software. However the fundamentals do not change.
- Photography is about light, both direct and reflected and how that light interacts with a light sensitive surface through the interface of a lens and a mechanism to control the time light falls on that surface, usually, but not always, a shutter mechanism.
- A sound working knowledge of the device being used is desirable although not always achievable in the short term.
- The development of a general and then individually considered aesthetic sensibility
- ‘Seeing’ as opposed to ‘looking’
- Understanding the difference between a ‘snapshot’ and a ‘photograph’
- Understanding processing workflows for both traditional and / or digital photography.
These can be considered the basics on which a developing photographic practice can be built.
Photography is essentially a science that has both theoretical components that connect history and practice together. Whether students have access to a darkroom or not is to a degree irrelevant simply because traditional darkroom theory can be taught because it encourages a better understanding of how we got to where we are.
GENERAL DARKROOM AND CAMERA THEORY
The Camera
- A camera is essentially a light proof box (Camera Obscura) with an aperture, a mechanism to control the time light enters the device and ‘film plane’ onto which light falls and forms an image. I use this very generalised description because a ‘camera’ can take many forms. For example; a pinhole camera won’t have a lens or a shutter as such, it may just be some tape or a finger held over the aperture / pinhole. In commercial Pinhole cameras you may have an aperture matched to the focal length made from brass or copper and a rudimentary shutter as well as a mechanism, not unlike that found on old large format cameras, that allows you to slide unexposed paper into the camera back.
- The lens is the traditional means of focusing light onto the film plane. Inside the lens barrel the most common components are the aperture and the lens or lenses. On the lens barrel there is usually a Focus Ring (for manual focussing), an Aperture Ring (for selecting the aperture) which determines 1.’how much light’ enters the camera and 2. the ‘depth of field’ DOF or ‘zone of focus’ and, only found on zoom / telephoto lenses or lenses with multi -focal lengths, 3. a focal length selection ring.
- Inside the camera body there is the shutter, which sits in front of the ‘film plane’ / ‘image plane’. The shutter determines the ‘amount’ of time light falls on the film plane / image plane’. The light sensitive material behind the shutter can be either film or a digital sensor. In the case of a pinhole camera unexposed photographic paper sits at the back opposite the pinhole.
- In SLR and DSLR cameras a mirror sits between the lens and the shutter and reflects light up to the pentaprism which directs light to the viewfinder. This mirror must be raised to allow light to reach the film plane and returned to its normal position when the shutter button is pressed.
- Mirrorless cameras do not have a mirror or pentaprism. Instead data taken directly from the Sensor and the Bayer Array is used to form the image preview.
How does light behave?
When light passes through the lens the rays that form the image are inverted both vertically and laterally. So the image is upside down and laterally reversed. .
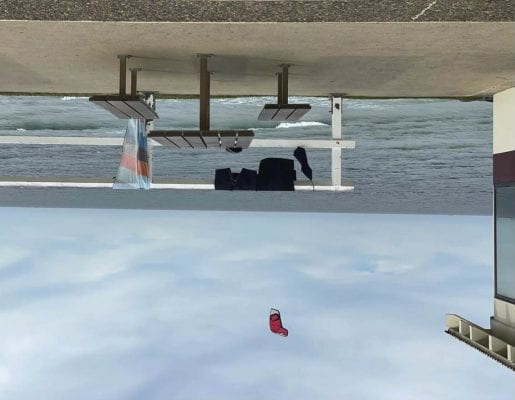
The image on the left is representative of the view through the camera. The image on the right is how the image reaches the film plane (laterally reversed and upside down). To see it the way we are seeing the view with our eyes the camera’s demosaicing algorithm has to rearrange the pixel data to reconstruct the view.
When light strikes the sensor of a digital camera the sensor takes a photon count and converts this into data. This data constitutes the greyscale information for the image. Sitting above the sensor is the Bayer Array. On a camera with a 20 megapixel sensor there are 20 million pixels or light sensitive components. For every 4 of these the Bayer Array collects two green, one red and one blue bit of information. A Demosaicing Algorithm then constructs all the other colours in the image based on a sampling sequence of the RGB components of the image. Two things happen here, the data for the image in the nominated format is written to the SD Card and the data for the JPEG preview is generated. At this stage no image exists its just data and a file name that points to where that data is written on your external storage. Transferring that data to a web browser or editing software results in that data being used to regenerate the image for viewing or producing a digital print.
However when light strikes film it interacts with the silver halides (B&W) or silver halides and dye layers, cyan, magenta and yellow (Colour film) to produce a latent image on the film which is then converted into a physical image (negative) during developing and subsequently a print (darkroom processing)